|
|
 Enhancements /
Modifications - Enhancements /
Modifications -94 SC2 |
|
|
Enhancements /
Modifications - 94 SC2 |
| Jump to: | Braided Brake Lines | Russel Speed Bleeders | Eibach Springs |
| Schroth Harness | Hawk Brake Pads | Autometer Gauges | |
| Stiffer Motor Mounts | KYB Struts | (more on next page) |
|
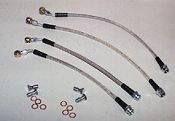
Braided Stainless Brake Lines With more track time with the SPC certain to be in my future, these braided stainless lines will certainly help the brakes perform better when pushed to the extreme. Swapping these lines was not an easy job, mostly due to repeated harsh winters involving road salt & rust. A good set of flare-nut wrenches (Craftsman at the absolute minimum) is required, and make sure you've also got a can of penetrant and a container to catch the leaking brake fluid. I even had to resort to using a V-shaped Vise-grip pliers specifically made for stubborn nuts (with no teeth) to loosen the nut connecting the hard lines to the stock rubber lines. You can see SPS's instructions for installing brake lines HERE. |
| Since the brake system needed to be bled after a job like this, I took the opportunity to change the fluid to something a bit better - I chose Castrol GT-LMA. (You can see SPS's bleeding instructions HERE, and some brake fluid comparisons in my tech section.) I have to say that after installing the braided lines, fresh rotors, and the Castrol fluid, the brake pedal feels - d a m n g o o d - . I'll provide more feedback after the SPC's next track session. 11/99: After another day out on Gingerman raceway, I can say that the brakes performed well. I was slightly disappointed that I really didn't notice any difference between this track session and the previous, as far as brake performance and pedal feel goes (difference between sessions: new front rotors, turned rears, new fluid, new braided lines). With the street pads on for normal everyday driving, I do continue to enjoy improved pedal feel which wasn't as pronounced while on the track.
|
|
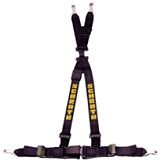
Schroth Rallye 4 Harness After 3 road course events (and plenty more in the future), I've decided that it's finally time for this worthwhile addition. I purchased the harness from Best Racing for a very good price (Best usually hosts the SPC's lapping sessions at Gingerman Raceway). In addition to protecting the driver in case something unfortunate happens, it also holds the driver more firmly in the seat and makes him feel more like an extension of the car as he navigates the course. I will greatly appreciate not having to worry about bracing or sliding around (especially with leather seats). The 4-point harness is extremely well-made. The front
and rear parts are connected with a buckle and can easily be disassembled and hidden for
everyday driving. Installation is fairly simple and requires both a male torx bit
set for the belt anchor bolts, and a female torx socket set for the seat anchor bolts.
The factory bolts are all fastened with Loctite, so it does take some serious force
to break them free. From there, installation is easy. |
|
| Mid-2000: Best Racing is no longer in
business. Too bad - we'll miss 'em! 3/27/2001: Added another harness for the passenger side since passengers while on-track often slide around on the slippery leather seat. The design of a passenger-side harness is different though, so you cannot use the same one as the driver side.
|
|
|
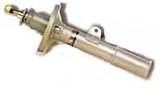
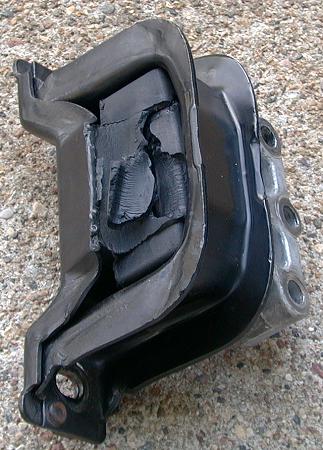
395 N/mm Motor Mounts (Engine/transaxle struts) Being twice as stiff as the stock units, I'm hoping that these SPS pieces will reduce engine motion and prolong the life of my top (torque-axis) mount - one of the weak points on my car that recently showed itself (pic of my old torn-up mount HERE). Logically, they should also help prevent wheel hop on hard launches to some extent and I'm looking forward to seeing if this is true during the next visit to the dragstrip. One mount resides under the factory airbox & battery tray, and the other is under the crank pulley way on the bottom of the engine on the passenger side. Installation was quite easy, especially if the time is taken to unbolt the torque-axis mount in order to jack up the engine for more clearance to remove the bottom mount. It sure is nice to have an easy job for a change! |
7/4/2000: An evening at Wisconsin International Raceway's dragstrip and a few absolutely killer burnouts makes me feel like these stiffer mounts (in combination with the KYB struts & Eibach springs that I'd also recently added) do help reduce wheel hop and do their part in helping to improve traction - at least, compared to the last time I'd been at the dragstrip. Early 2003: Installed an additional set of these on my '92 SC. 5/2003: Removed these from the '92 SC in order to try a set of Twistec mounts. See the modifications section for my '92 for my thoughts on those.
|
|
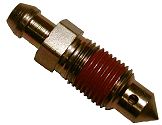
Russell Speed Bleeders (catalog # 3956 (10mm) disc, # 3957 (7mm) drum) Faced with the task of bleeding my brakes at least once a month during summers in preparation for track events, these speedbleeder screws should make the job much easier. Normally a two-person job, these screws incorporate a one-way valve and an effective thread-sealing material to allow one person to bleed the brakes quickly and easily. You can find info on these at Russell's site, and at SpeedBleeder. I ordered mine from Summit Racing. If you'd like more info on bleeding brakes, SPS has a very good tech article HERE and you can also take a look at some brake fluid info (& some helpful links) HERE. Mid 2002: One of the speedbleeder screws has started to suck in air while bleeding. It appears that very frequent usage causes the thread sealing material to break down or wear out. I ordered another set from Summit Racing to replace the bad one.
|
|
|
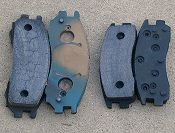
Hawk Brake Pads Since our day at Putnam Park Raceway was approaching and we'd easily be breaking the 100 mph mark on the track's long front straight, I knew it was time to upgrade the pads once again. Up until now, I'd been using the Carbotech F-Compound (F) & generic Napa (R) for track sessions. I picked up Hawk Blue (F) & Hawk Black (R) pads from Best Racing (they offer a nice discount for SPC members). These pads are made by Carbotech and they also put out the same huge amount of dust that the F-Compound do. Pedal effort required seems to be a lot less and warmup time is minimal. They also bite like you wouldn't believe. These pads are not suitable for street use. I drove them for one day on the street with my Nitto tires and the combination would confuse the ABS during hard stops giving less than optimum performance (probably due to the tires being the weak point). They do tend to squeal, squeak, and grind a bit most of the time. On the track with my Kumho tires, these pads give amazing braking power and very very fade-resistant. |
| 5/27/2000: W A R N I N G ! ! If these pads are driven in the rain, you will experience severe rust caused by the brake dust, on both your paint and your wheels. The Blues put a layer of dust on the side panels of my car, which rusted and was extremely difficult to remove from the surface of the paint (you can see a picture HERE). I had to use a clay bar, but I imagine that a buffer with polishing compound might take care of it also. The Blacks left rust chunks on my rear wheels which became imbedded into the surface of the aluminum rim (which I believe IS clear-coated). It required hours of scrubbing with CLR & LimeAway to remove most of it. I also know another person whose rust was so bad that it ruined one of his nice 17" wheels and he had to purchase a replacement. I don't know if the dust was solely from the pads, or if it was from their effect on the rotors as well. All this occurred as the car was in the rain for a few hours. This has also happened the morning after driving on the track - dew contacting brake dust on the paint causes rust in a very short period of time. Be sure to wash your car thoroughly (by hand would be best) as soon as possible after using these pads. These pads are absolutely killer on the track, but be aware of what will happen if you drive them in the rain or allow any moisture to come in contact with the dust residue on your paint. Mid-2000: Best Racing is no longer in business. Too bad - we'll miss 'em! Early 2003: I've been told by several people that Hawk no longer makes the Blues for Saturns. Damn, that's unfortunate. I love these pads. Time to try something else, I guess. 8/2003: Having tried other pads on the track besides the Hawk Blue, I've found there is no replacement for them. I decided to see if a set of Hawk Blue pads from another car could be made to fit. Details are in the projects section.
|
|
KYB GR2 Struts After 91,000 miles, I thought it might be a good time to replace the original factory struts. The KYB fronts are slightly stiffer than stock, and the rears are equal to stock. The main reason i went with the KYBs and not something more performance-oriented was because I did not want to sacrifice much (if any) ride quality, since they are going on my daily-driving car. Plus, being slightly stiffer than the originals, I'm sure I will still notice a nice bit of improvement in handling & cornering. I picked these up from Carparts.com - they periodically run coupons in car magazines that made the struts a steal. Installation was very time consuming, but not terribly difficult if you have a good set of sockets & a breaker bar. And as long as I was installing struts, why not add a good set of springs?
|
|
|
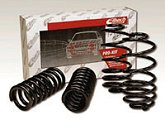
Eibach Pro-Kit Springs These springs offer better control and handling without making the ride overly stiff. The car's drop was supposed to be about 1.2 inches, but it sure seems like it's now at least 2 inches lower. For installation of springs (and struts), use a set of spring compressors! You can them up from JC Whitney for less than $20, and I don't know why people attempt this job without them. When installing the rears, make sure you wrap the lower coils with either hose or split-loom or the progressive coils will clank together as you go over bumps. And don't forget to trim the strut boot's bump stops as the instructions will tell you. |
| The combination of the KYB struts and Eibach springs is surprisingly civilized during normal driving. There is noticeably less body roll during cornering, and it seems easier to find the limit of my street tires. After installing shorter springs on Saturns, it is common to feel a shimmy on acceleration since the angle of the CV joints/half-shafts is now off. Even though these don't drop the car as much as many other brands of springs, I do feel the shimmy below 20 mph. I've heard that it can gradually go away, or that people just become accustomed to it, but personally I would prefer to try to fix it instead of just accepting it. I can't imagine how bad it must be for the people who use even shorter springs, not to mention how kidney-punishing the ride must be. Rumor has it that Sierra Performance has experience with correcting the shimmy problem, so it is likely that I will be in contact with them soon. The spring/strut combo makes the car feel much better on the track. High speed braking upsets the balance of the car far less, steering response is improved, and body roll is reduced. In daily street driving, these effects are far less noticeable - and combined with the stiffer ride and shimmy, I would almost prefer the stock setup. But since the car is seeing more and more track time (and they perform sooo well out there), I have decided that I can accept the compromises in daily driving. You can take a look at some research I did before I bought springs HERE. 9/2/2000: After replacing the struts and springs, I've been hearing some noise from the rear deck area. Whenever I'm on a road that isn't so smooth, I hear a noise sort of like walking with some change in my pocket. I did find the source - those little rubber cups that attatch to the top of the rear deck and cover the strut mounts had come loose. I assume that they must be there to muffle noise. I used some duct tape so they don't come loose again.
|
|
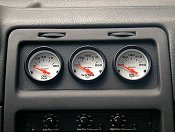
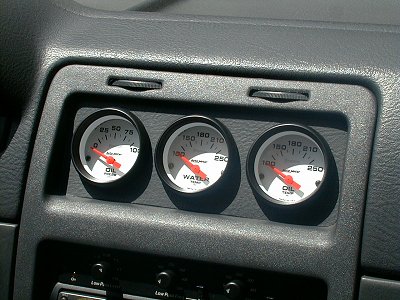
Autometer Gauges Recently I've been witness to more than one engine biting the dust on the track due to oil problems. In order to better monitor the status of my engine, it was time to add some gauges. I picked Autometer Phantom's series oil press, oil temp, and coolant temp (all electronic), and the white color went well with the white gauge faces that I already had. Carparts.com was the best deal once again due to the coupons that they frequently run in car magazines. I decided to put these in place of my upper vents since it was the best way to integrate them into the interior and have them look almost factory. I've seen pillar mount installations in Saturns that look very good, but they don't quite have that 'from-the-factory' look which is important to me. In addition, a pillar mount would have adversely affected the sound of my driver's side tweeter. |
|
| I started by buying another center vent piece and carefully removing all the plastic fins. I added a piece of gray plastic to the front, securing it with fiberglass, in which the gauges are mounted. A quick-release Molex plug connects the gauge assembly to the sensor wiring (visible in the second picture). Since I didn't want to give up the airflow of these vents in very hot or very cold weather, the gauge assembly was made so that it could be removed very easily. Wiring the gauges & plumbing the sensors wasn't too difficult, but make sure that you buy the proper fittings from Autometer for the temp sensor & oil press sensor (#2268 - 1/8" NPT to M16x1.5). You'll also need a good variety of socket universal joints & extensions to get around the starter - but only if you are adding two sensors (oil press & oil temp) to the block and leave the idiot light sensors as they are. 7/4/2000: The Autometer Phantom series oil temp guage only reads up to 250 degrees F, which I've already seen on the highway on warm days. If you are looking to use these on the track, you may want to go with a model/brand of oil temp gauge that has a higher range.
|
|


