|
|
 Enhancements / Modifications - Enhancements / Modifications -92 SC |
|
|
Enhancements / Modifications - 92 SC |
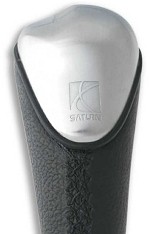
| Autotechnica Shift Knob Added 7/2003 This knob is made by Autotechnica and is sold through Saturn retailers as a part of Saturn's "Expressions" line of add-ons. You can also find it sold at various other places. I bought this one on eBay. The top part is aluminum with a Saturn logo formed into it and it looks great. It perfectly matches the trim rings on all of my Autometer gauges (see below) and the color that I chose to paint the rollcage.
The contour and size of the knob also feel very
good - better than the stock knob. One disadvantage to using this knob
is that it will raise the height of your shifter at least an inch, unless
you modify the shift boot (cut and chop) to mount it lower on the shaft.
Since I have a shortened shifter with no boot, it was no problem getting the
knob height to be what I wanted it to be. |
|
|
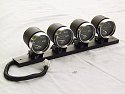
Autometer Carbon Fiber Gauges I chose
Autometer's Ultralite series of electronic gauges with a carbon fiber face.
A large tach with a programmable shift light is mounted dead center to the
top of the steering column, and fuel level, oil pressure, oil temp, and
coolant temp gauges are mounted to the center of the main dash support.
While each of these gauges is very lightweight, the steel cups that
Autometer sells (if you are surface mounting instead of flush mounting)
aren't as light. Each feels as though it weighs more than the gauge itself. |
Connecting these gauges was pretty simple. Wiring up the fuel gauge (use Autometer's 240-33 ohm model) so that it works with the stock sender was somewhat tricky though, requiring factory service manuals to get a clear picture of exactly how the gauge in the stock cluster is wired. Removing the stock cluster doesn't just remove the stock fuel gauge, it removes part of the circuit that makes it work with the stock sender. Four gauges are mounted on a piece of aluminum channel, and secured to the dash support with two bolts. Molex connectors are used on the wiring to allow quick and easy removal when necessary. Update: While many people may consider
the sheer size of the Autometer tach excessive, its visibility mounted on
the top of the steering column is excellent. Being blasted in the eyes by
its huge shift light makes it unnecessary to ever look at RPMs on the tach.
Many of us like to think that being able feel and hear the RPM is enough of
an indication of when to shift, but with so much happening with your mind
and body on the track, it's one less thing that has to be occupy your
thoughts. This tach is one of the most worthwhile and useful additions so
far. |
|
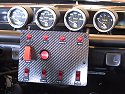
To keep the carbon fiber theme
from the gauges going, as well as help save as much weight as possible, I
bought a piece of real carbon fiber off of eBay to use for the base of the
main switch panel. It is amazing how lightweight and stiff it is, and it's
extremely easy to work with. You can use a jig saw, drill, cutting wheel,
sanding disc, and sandpaper to work on it with great results. This panel
houses several warning lights that used to reside in the stock cluster, as
well as a few accessory switches. Since the heavy cast stock ignition
cylinder and bracket assembly were removed from the steering column and
tossed, an aircraft toggle run switch was added, as well as an OEM Honda
S2000 start button. Yes, this car does have some Honda parts in it. I don't
feel bad about it though, since it has a bit of Corvette in it as well (fuel
pressure regulator & wheel studs). |
|
Brackets available from Longacre fasten the panel to a cross bar of the rollcage, and a Molex plug was used on the wiring to allow quick removal when necessary. Interesting fact: Remove
the battery charge idiot light (either by pulling the bulb or removing the
gauge cluster), and the alternator will not charge the battery. |
|
|
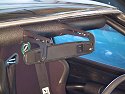
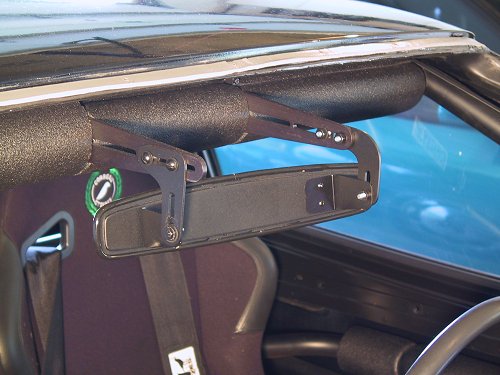
Longacre Panoramic Rear View Mirror
Since my rearview mirror and its mount
were removed when the stock windshield was replaced with Lexan, a Longacre
panoramic mirror was purchased to replace it. The mirror includes special
brackets to allow it to be mounted to a cross bar of the rollcage. What
seems odd is that Longacre figures the mirror will always be mounted between
the bar and the driver. In my car, the bar is very close to the driver and
the mirror had to be mounted a significant distance in front of it. This
required fabrication of additional L-shaped brackets from aluminum. The end
result worked out pretty well. It allows a very wide view
that I wouldn't have with a normal mirror, and this wide view is beneficial
since portions of the rollcage obstruct some of the mirror's rear view. |
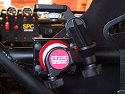
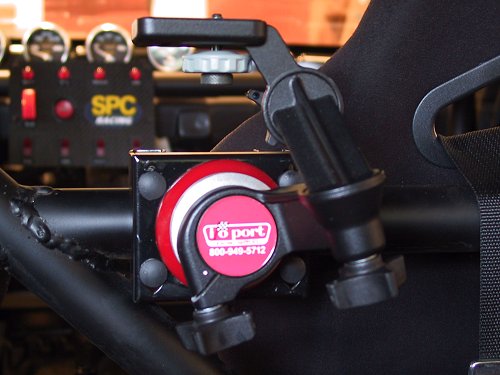
| IOPort Camera Mount Most people wouldn't think of this as a piece that makes the car faster, but it certainly will. Reviewing video after an event shows me exactly how I did and what areas need improvement. This was another great purchase from Livermore Performance.
This mount attaches directly to the rollcage,
and allows a high degree of flexibility with several joints where the arm
can be angled and adjusted. It also incorporates polyurethane in its mount
in order to help minimize vibration. Much of the in-car video on my
action page was shot using a camera on this
mount. |
|
|
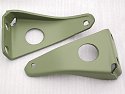
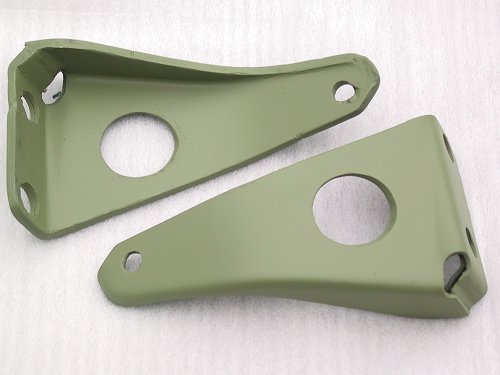
Reinforced Rear Sway Bar Brackets
On a Saturn, these brackets connect the rear
sway bar end links to the lower end of the strut housings where they meet
the rear knuckles. These brackets are subject to a good amount of force on a
car that is driven aggressively, and they do tend to weaken from rust over
time. I've seen several of these that have been broken, and don't want that
to happen to me on the track while at speed. |
| This wasn't a bad job to do. Get two sets of
stock brackets. Put one bracket over another, grind down whatever
parts don't quite overlap, and weld them together. You can see a picture of
the welded brackets in primer at the left. |
|
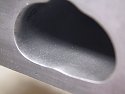
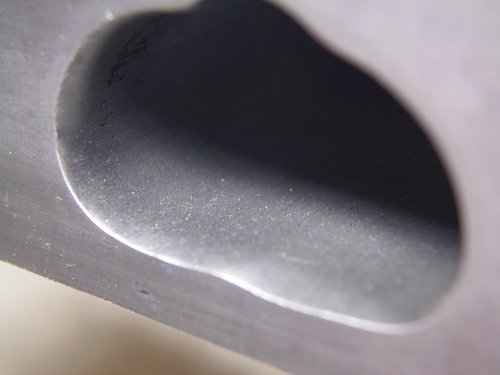
| Extrude Honed Intake Manifold The process applied
to this intake forces a stiff abrasive clay through passages, which greatly
smoothes them out and allows better airflow. It is easy to see the
difference when taking a look into this manifold. When the stock surface is
rough cast aluminum, the new surface is much smoother and almost has a
polished appearance. You can see a picture of one of the runners at the
left. |
|
| Dyno charts for this
manifold on SPS's website (see them
HERE) show nice a horsepower gain in the extreme upper RPMs, at the
expense of losing some power at lower RPMs. For a track-driven car
that lives in the upper RPM range, I doubt I'll have a problem with this.
For a street-driven car with other basic bolt-ons, I would NOT install this piece.
I stripped the clearcoat and powdercoated the manifold yellow (pics are on
my powdercoating page) prior to
installation. |
|
|
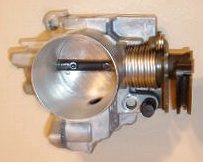
55mm XRC Throttle Body I got this piece used as part of a package deal and probably would not have purchased it otherwise. Dyno charts that I've seen, both online and in a past issue of Sport Compact Car magazine, show virtually no gain on a naturally-aspirated motor - at max, maybe a horse or two. But, since I already had it and do have plans for forced induction in the future where it will benefit more, it was powdercoated yellow and installed. (My powdercoating page shows a picture of a different TB I coated for a test-run).
The quality of this piece isn't as high as I
expected. If a stock throttle body is machined all the way through more than
a millimeter or two over stock, several vacuum passages will be bored into.
|
|
The solution on this piece appeared to be partially filling those passages
with pieces of plastic. The problem is that their fit wasn't perfect,
allowing some air leakage from one side of the throttle plate to the other
when it was closed. This caused a very high idle until I pulled everything
apart and made those plastic pieces fit a bit better in order to prevent the
air leak. Update: The company that offered this throttle body is
no longer in the business of selling Saturn performance parts (RIP). |
|