|
|
|
|
| 1/10/03 - Received black rollbar padding, some toggle switches, a panoramic rear-view mirror, and some rollbar brackets in the mail from Longacre. Gotta wait until it gets warmer though as I want to clean and paint the interior before I install any of it. |
|
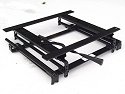
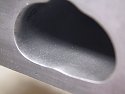
Also attacked one set of my Corbeau seat rails with the air cutoff saw to remove a good portion of it. When sitting in the seat, there isn't much headroom with a helmet on, and the helmet comes very close to part of the roll cage which runs forward to back at the top of the door frame. The Corbeau rails have brackets built into them which provide height adjustability. Unfortunately, the lowest seat height still doesn't provide enough headroom. A picture of the assembly before the modification can be seen on the left. |
|
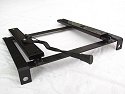
Removal of the height adjuster brackets, and re-welding the remainder of the rails lightened the rails by about 4 lbs, and an inch of headroom was gained. After a lengthy test-fit of both the seat, rails, and driver, the same process was done on the other set of rails. The finished product can be seen at the left. |
|
2/13/03 - Got in on a group buy of Twistec dogbone motor mounts. Constructed from stainless steel and polyurethane, they sure do look nice. While installation of the dogbone mounts is usually easy, one of the mounts was slightly skewed and the bolt did not want to line up right which made these things take way longer to install than they should have. The end result appears to be worth it though, as now I'm able to hit the throttle without the motor moving in the engine bay at all. We'll see if these do their part at helping to limit wheel hop as I hope they will at the dragstrip. Stay tuned. |
|
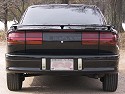
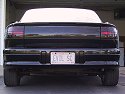
3/31/03 - I took the new 95 front facia, reverse lenses, new popup headlamp covers, and the new SC1 vertical trunk panel to a local shop to be painted. After shaving the lock for the trunk lid, and tinting the tail lamps (using spray available from Summit Racing - which was WAY too much work in my opinion), boy does the rear end of the car look nice. Click the photos for larger views. |
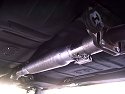
| 4/17/03 - Ordered and received a set of Autometer carbon-fiber face gauges from Summit Racing that I'll be installing in the car. Also picked up a 3" Dynomax straight-thru race muffler. After quickly hacking off the remainder of the stock exhaust system (which was just the cat and resonator at this point), I loaded the car on the dolly and took it to a local exhaust shop. I had them weld up two exhaust systems which use the stock rubber donuts and attach with one band clamp. With this setup, both can be swapped in less than 5 minutes. Both are connected to the stock flange off the OEM '92 header, and use 3" diameter pipe. |
|
I wanted one exhaust with the least restriction possible for the track, and the Dynomax straight-thru is for this purpose. The finished setup using the Dynomax is loud enough to wake the dead, and sure sounds like it is louder than the car was with the open header. |
|
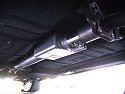
The second setup I had made utilizes a baffled Spintech square-looking muffler and was supposed to provide a quieter tone (more info on this fascinating muffler design HERE). Occasionally I like to take a drive on the backroads near my house to test changes to the car and I'd like it to be a little quieter. Unfortunately, both sound equally as loud so it looks like I'll have to look for yet another muffler that fits under the center section of the car which is baffled and provides more quieting. Regardless, I'm looking forward to dynoing all the exhaust setups to see how they compare to each other in the near future. |
|
4/26/03 - Took the car to Wisconsin International Raceway. Details and my thoughts can be seen on the results page, and video can be seen on the in-action page. |
| For some reason, the vinyl that I used to black out all the edges of the lexan windows has started to bubble. I have no idea why this is, but it became very visible after a full day outside in the sun. Yet another task to be added to the list of stuff to do - re-apply the vinyl and hope it doesn't happen again. |
|
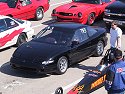
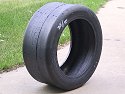
5/7/03 - Ordered two more Konig Helium wheels from G-Force Performance (read about my excellent experience with them here) to mount some drag slicks on. Ordered and received a pair of Mickey Thompson ET Drag tires from Summit Racing and had them mounted. Boy, are these a beautiful set of tires that look like they mean business. I can't wait to get back to the dragstrip. With the amount of traction these tires will provide, I wonder which part will be the first to break - motor mounts, axles, or who knows what. We'll have to see. |
| I also -finally- finished cutting up the parts car I'd bought last fall and hauled it away to a nearby recycler. I cut the rear 2/3rds of the car lengthwise, and as the final cut made the pieces fall apart, it looked like something out of a cartoon. Pictures can be found on the page dedicated to this parts car. 6/21/03 - I removed the transmission, Quaife limited slip differential, and Centerforce dual friction clutch from my '94 SC2 and installed them in my '92 SC. Makes it sound easy, doesn't it? It wasn't too bad, just a little time-consuming. 7/03 - Lots of work is going on trying to
get the car ready for an upcoming driver's school. The ignition cylinder/switch,
turn signal and wiper switches, and all the other junk on the steering column was removed.
The column was removed, sanded, painted, and reinstalled. An ignition switch,
start button, other misc switches were added to a custom carbon fiber switch panel that is
now attached to the front portion of the cage. The replacement of the ignition
cylinder took some serious time, as eight wires enter it. One of them wasn't even
listed in the factory service manuals. |
|
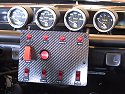
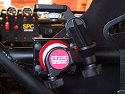
Autometer carbon fiber-faced gauges for coolant temp, oil temp, oil pressure, fuel level, and RPM were also installed up front where the dash used to be, but some of the wiring for them has yet to be completed. |
|
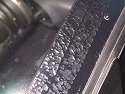
Fabrication of a switch panel was also completed, and it attaches to the front bar of the cage. Yes, that is real carbon fiber, and it's a joy to work with. It's amazing what you can buy on eBay. |
|
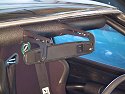
I picked up a panoramic mirror and rollbar mounting brackets from Longacre. Unfortunately, I had to make some 90 degree brackets so I could mount the mirror forward of the cage's top bar. Yet another job that took way too long to do, but it does provide a great view behind the car. After all, that's where a lot of other cars are going to be. :) |
| Installed a new set of Carbotech Panther Plus brake pads in the front as my favorite Hawk Blue pads were nearing the end of their useful life. 7/11/03 - Attended a driver's school held by Badger Bimmers BMW club at Blackhawk Farms Raceway in Rockton IL. Details and my thoughts can be seen on the results page, and video can be seen on the in-action page. |
|
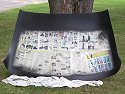
7/20/03 - The problems blacking out the edges of the Lexan windows continue! Early on, I had painted the edges of the small side windows to black them out, but masking tape removal left a slightly ragged edge. So I decided to do the remainder of the window edges with good quality vinyl. After a few months time and a few days in the sun, much of the vinyl formed bubbles under it (even though I went through great pains to install it correctly). |
| So, I get to do this job once
again... I pulled the windshield, and purchased some professional auto body painter's
masking tape from a 3M dealer. I just finished spraying the windshield, and we'll
see if this better tape gives better results. |
| 7/27/03 -
Participated in my first Solo 1 autocross at Blackhawk
Farms Raceway in Rockton IL. Details and my thoughts can be seen on the results page, and video can be seen on the in-action
page. I received and installed an AutoTechnica aluminum & leather shift knob that I bought off eBay. It's slightly smaller than the OEM, but has a nice feel to it. At the same time, I finally installed the custom true short-shifter I'd bought a long time ago. They are quite an improvement in precision and feel. I also took the time to remove the wiper motor, wipers & arms, transmission assembly, and washer tank and lines (details in the weight reduction section). I finished painting the edges of the windshield, and it turned out perfect. Good paint and masking tape along with meticulous surface prep were what it finally took to get it done right. 8/9/03 - With my favorite Hawk Blue brake pads no longer being offered for Saturn, I've
decided to try to fit them from another car. Details can be found HERE. |
|
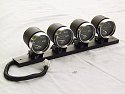
I received an IOPort camera mount from Livermore Performance and mounted it to the cage. Recording video while on the track is a great way to later see what I am or am not doing right. Most people wouldn't think of a video camera as a part that will make the car faster - but it definitely will. |
| 9/2003 - Picked up a used Borla cat-back exhaust that I'm considering using to replace the more open (loud-as-hell) setup on the car. They haven't been made for years, and I've had one on my '94 forever. When one comes along, it's worth its weight in gold. |
|
Also bought a used Extrude Honed intake manifold, XRC (now defunct, RIP) 55mm throttle body, and SPS fuel pressure regulator as a package deal for a great price. Since the previous owner appeared to have painted the manifold gray, I hit it with some paint stripper to remove it. In doing so, I realized that the aluminum has a clearcoat on it. So, the whole thing was stripped and cleaned up as prep to be powdercoated. |
| SPS's website shows a handful of horses are freed up by the mainfold in the upper RPM range at the expense of some power in the lower-to-mid RPM range. For this car, I tend to think that will be fine due to the fact that the motor stays in the screaming-RPM range most of the time anyway. Since the TB and FPR likely won't make any measurable difference in power on this naturally-aspirated motor, they'll be put on the shelf for future consideration. I have a feeling that a forced-induction motor build is in my future anyway. Also stripped and coated a valve cover (pic here), and it ended up looking pretty good. |
|
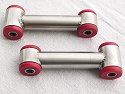
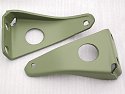
10/2003 - Took two sets of rear sway bar end brackets and welded them together to create a thicker and stronger set. I've seen several that other people have broken over the years, and that's not something I want to have happen on the track at speed. Picture at the left is in primer before they were painted black. |
| 11/2003 - Bought a 2000 SOHC motor off eBay with only 17k on it. Why the heck would I need a SOHC motor? I can use the block, crank, rods, pistons, and oil pan. Why consider a rebuild when used low-mileage engines end up being significantly cheaper. The parts that I can't use went back up for auction and the motor will probably end up paying for itself. |